
Install
Instructions for the Cooling Fan Switch Mod
(Courtesy
of Xious)
This installation will allow you to turn your fans on manually on both low speed and high speed. This does the exact same thing as the SLP fan switch, which sells for $70. It is a real simple installation. It does not require cutting any wires (although tapping into wires is needed).
The cooling fans are controlled via 3 fan relays. These relays are controlled by a switching ground which is, in turn, controlled by the PCM. When the PCM monitors a certain temperature from the thermostat, it closes one of the ground switches to turn the two fans on low. When the PCM monitors a higher temperature, it closes the other relays allowing both fans to run at high speed. This switch will allow you to run the fans on either low or high at any time, even when the car is off. This is good for sitting in traffic and staging lanes. If you only have one fan, you will only be able to turn the fan off and on, not high and low. (Note: In some cars farther modification is needed to use the fan(s) when the car is off)
Parts needed:
Cars
with two fans:
DPDT center-off switch (size and design according to liking)
(2) two LED's (2V, 20mA typical) (Alternative: (2) LED's with resistors included)
(2) two resistors (500 ohm, 1/2 Watt)
wire (preferrably 2 different colors)
wire taps
wire connectors
Cars
with one fan:
SPST switch (size and design according to liking)
(1) one LED (2V, 20mA typical) (Alternative: LED with resistor included)
(1) one resistor (500 ohm, 1/2 Watt)
wire (just one color)
wire taps
wire connectors
There are three connectors on the passenger side fender well under the hood. The frontmost connector is the one you will be tapping into.
The connector harness has little beveled letters for each wire. You will be tapping into H (which is dark blue) and J (which is dark green). The dark green wire controls the low speed and the dark blue wire controls the high speed. Tap into both of those wires and run the wire back into the car through the firewall. (Note: Cars with one fan need only to tap into and run one of the two wires) There is a grommet directly behind the PCM that you can use. Unbolt the plastic PCM bracket and remove the PCM and bracket together. The grommet ends up at the bottom of the dash just above the passenger's feet. Make sure you run enough wire to strecth under the dash and to whereever you will mount the switch.
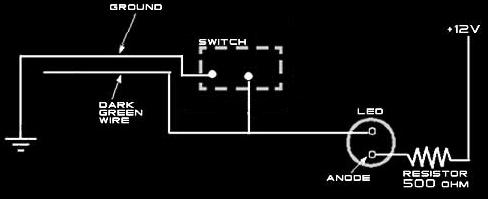
Now, you will need to find a +12V source and a good ground. The ground will be connecting to three terminals on the switch and the +12V will be connecting to the LED's (actually to the resistors leading to the LED's). It's best to find one near where you are going to mount the switch. Here is a diagram of how to wire the switch.
For cars with two fans:

For cars with one fan:
Here are some pictures of Xious's install. The LED's will indicate which speed the fans are on. These LED's will light whether you have turned the fans on manually or the PCM has turned them on. I have the green light set to low speed and the red light set to high speed. Both LED's light when the fans are on high speed. (In single fan cars, there is one LED that will light when the PCM turns on the fan or when it is turned on manually)


Most of this pages content and format was stolen from Xious. I simply added the material involving the single fan cars.